 |
| Former home Kitchen Remodel Before |
 |
| Former home Kitchen Remodel After |
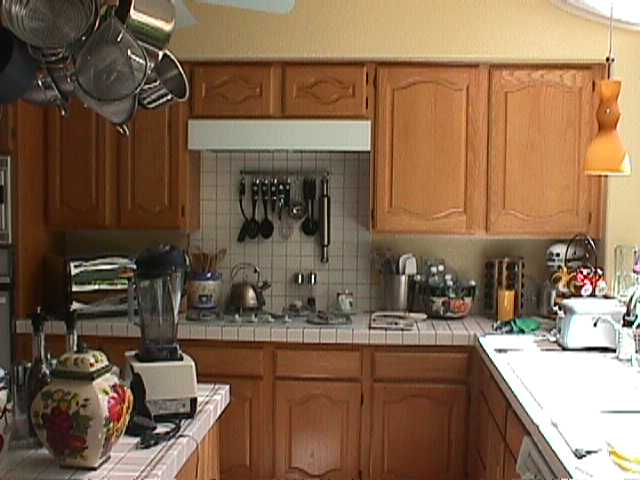
Above is the pictures of the before and after of our former home major remodel. We started by gutting the entire kitchen and starting over again. Every inch of this space had a purpose. As you can see there were plenty of decisions to be made. You have to take them one at a time so you won't feel overwhelmed with the process. I simply loved the way it came out. Who wouldn't want to cook in this kitchen.... We added an area where 2 bar stools could be used for breakfast, lunch or dinner. The stove was to die for...a 48" Themador that cooked like a dream. It was my dream kitchen and is truly what sold the house when it came time to put it on the market.
 |
| Former home Dining Room Before |
 |
| Former home Dining Room After |
|
The above pictures are of our former home before and afters. The room was originally supposed to be a den or study but for our use we decided to make it our dining room. As with most people the formal dining room is not often used so tucking it away in this area turned out to fit well in our home.
 |
| Former home Family Room Before |
 |
| Former home Family Room After |
The above pictures are from our former home before and afters. We took out the carpet, painted the walls, ceiling and fireplace. Throughout the bottom floor we put in 20 X20" imported Italian porcelain tiles that looked like travertine. The spacing between the tiles was only 1/32 of an inch. It was as close as we could get and allow for expansion. We placed it on a diagonal which made the room seem larger and it's pleasant to look at. Lighting is so important to any design. We always use dimmers and in the overhead lighting in all the rooms, we use only "spot" not flood bulbs. It is not as energy efficient but there's no argument that the obeisance of the room isn't better.
 |
| Former home Family Room Before |
 |
| Former home Family Room After |
|
|
 |
| Former home Sitting Area and Conservatory After |
|
|
 |
| Former home Backyard space After |
In the above Family Room we created several living spaces in the area. First the family room, then we added a sitting area where the original dining room was, and we added on a Conservatory at the back of the house. This all was part of the major remodel of this home. We also added a loft above these rooms where we had our media room and office space. I was going for a "Hotel Chic" look in this design, somewhere to gather for a nice evening of conversation.
 |
| Former home Master Bedroom Before |
 |
| Former home Master Bedroom After | | | | | |
|
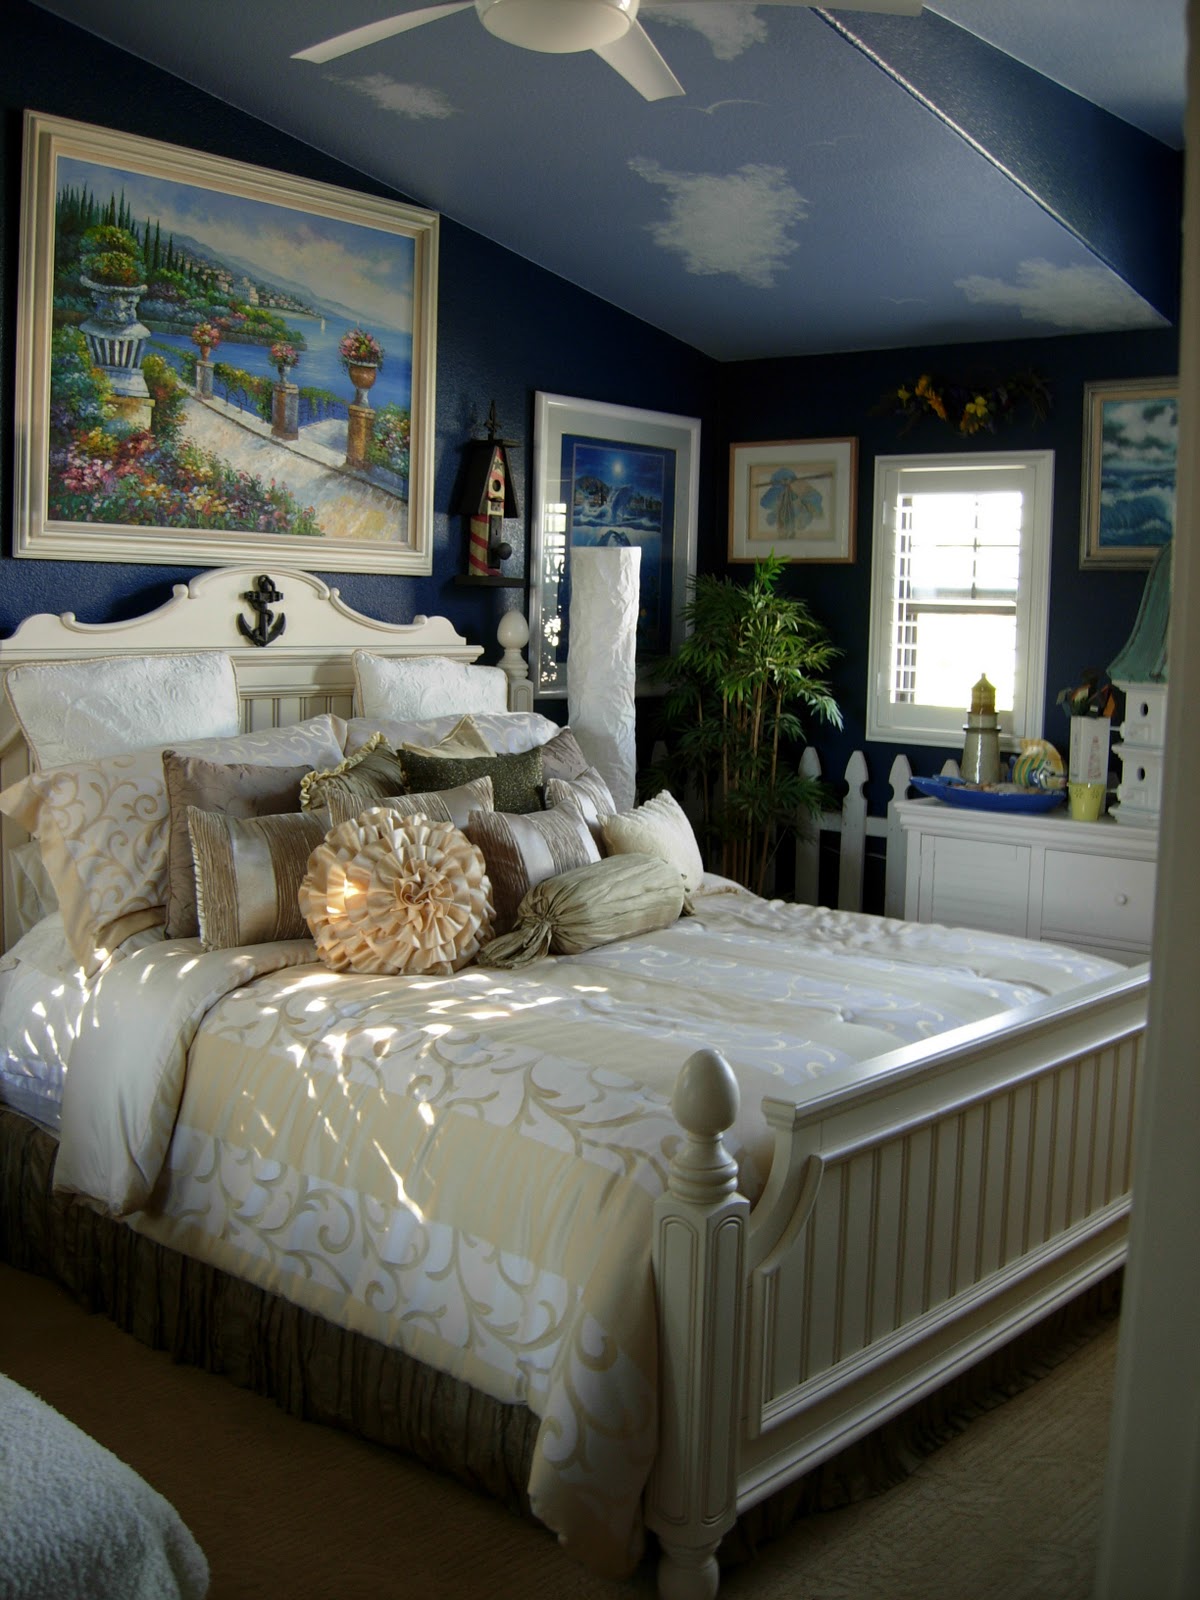
The above pictures are of our former home Master Bedroom before and afters. Here with paint, new carpeting, window coverings and design we created a very romantic bedroom space. The room has a retreat area to the right with a dual fireplace that is seen in the bedroom and bathroom. The colors are bright for a bedroom but if you enjoy bright and bold colors then use them. These colors were so in the winter time when it gets gray and gloomy outside you won't feel it because this room makes you feel happy and sunny all year long.....
 |
| Former home Second Bedroom (Guest) Before |
 |
| Former home Second Bedroom (Guest) After |
 |
| Former home Second Bedroom Jack & Jill Sink After |
The above was from our former home where we created a Guest room using a Coastal Living theme. The dramatic colors used is for those who feel they can take a walk on the wild side. The wall are painted using a dark blue with a lighter blue on the ceiling then I painted floating clouds and a few seagulls to give an open air feeling. We also used outdoor fencing to surround the edges of the room to create a cottage feel. In this room was a sink area (part of a Jack & Jill Bathroom) where I crackle finished the oak cabinets and my husband made a frame for the existing frame less mirror and I crackled that too. The bathtub and toilet were in a separate room on the left that adjoined with the 3rd bedroom. Guests appreciated the use of a private sink area in the room.
 |
| Former home Powder Room Before |
 |
| Former home Powder Room After |
Here is the Powder Room of our former home before and after pictures. As you can see we changed the faucets, lighting, mirror, flooring and behind the door on the right is a vanity with a frame less mirror that we framed and crackle finished the oak cabinetry. We painted the walls and ceiling in the same color here in a blue-gray.
 |
| Former home Master Bathroom Before |
 |
| Former home Master Bathroom Before |
 |
| Former home Master Bathroom After |
 |
| Former home Master Bathroom After |
 |
| Former home Master Bathroom After Sinks |
 |
| Former home Master Bathroom After Doorway |
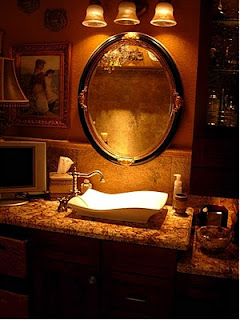
The above pictures are of our former home Master Bathroom before and afters. We gutted this entire space and started over. The design was of a Tuscany bathroom using travertine stone throughout, along with granite and painting the walls a rich gold color. The vessel sink was one of my favorite finds for this room. On the other side of the fireplace is the retreat in the Master Bedroom. Every inch of this bathroom was hand selected. Choose colors that make you happy, these colors may not be for everyone but the point of designing is for you and what pleases you and your family. Everyone else can do whatever they want to their homes, that's what it is all about....


No comments:
Post a Comment